> ## Documentation Index
> Fetch the complete documentation index at: https://translations.mintlify.site/llms.txt
> Use this file to discover all available pages before exploring further.
> MFA 用の SMS 通知と音声通知を設定する方法について説明します。
# MFA 用の SMS 通知と音声通知を設定する
export const AuthCodeGroup = ({children, dropdown}) => {
const [processedChildren, setProcessedChildren] = useState(children);
useEffect(() => {
let unsubscribe = null;
function init() {
unsubscribe = window.autorun(() => {
const processChildren = node => {
if (typeof node === "string") {
let processedNode = node;
for (const [key, value] of window.rootStore.variableStore.values.entries()) {
const escapedKey = key.replaceAll(/[.*+?^${}()|[\]\\]/g, (String.raw)`\$&`);
processedNode = processedNode.replaceAll(new RegExp(escapedKey, "g"), value);
}
return processedNode;
} else if (Array.isArray(node)) {
return node.map(processChildren);
} else if (node && node.props && node.props.children) {
return {
...node,
props: {
...node.props,
children: processChildren(node.props.children)
}
};
}
return node;
};
setProcessedChildren(processChildren(children));
});
}
if (window.rootStore) {
init();
} else {
window.addEventListener("adu:storeReady", init);
}
return () => {
window.removeEventListener("adu:storeReady", init);
unsubscribe?.();
};
}, [children]);
return {processedChildren};
};
export const AuthCodeBlock = ({filename, icon, language, highlight, children}) => {
const [displayText, setDisplayText] = useState(children);
const [copyText, setCopyText] = useState(children);
const wrapperRef = React.useRef(null);
useEffect(() => {
let unsubscribe = null;
function init() {
if (!window.autorun || !window.rootStore) {
return;
}
unsubscribe = window.autorun(() => {
let processedChildrenForDisplay = children;
let processedChildrenForCopy = children;
for (const [key, value] of window.rootStore.variableStore.values.entries()) {
const escapedKey = key.replaceAll(/[.*+?^${}()|[\]\\]/g, (String.raw)`\$&`);
let displayValue = value;
if (key === "{yourClientSecret}" && value !== "{yourClientSecret}") {
displayValue = value.substring(0, 3) + "*****マスク済み*****";
}
processedChildrenForDisplay = processedChildrenForDisplay.replaceAll(new RegExp(escapedKey, "g"), displayValue);
processedChildrenForCopy = processedChildrenForCopy.replaceAll(new RegExp(escapedKey, "g"), value);
}
setDisplayText(processedChildrenForDisplay);
setCopyText(processedChildrenForCopy);
});
}
if (window.rootStore) {
init();
} else {
window.addEventListener("adu:storeReady", init);
}
return () => {
window.removeEventListener("adu:storeReady", init);
unsubscribe?.();
};
}, [children]);
useEffect(() => {
if (!wrapperRef.current) return;
const originalWriteText = navigator.clipboard.writeText.bind(navigator.clipboard);
let isOverriding = false;
const handleClick = e => {
const button = e.target.closest('[data-testid="copy-code-button"]');
if (!button || !wrapperRef.current.contains(button)) return;
isOverriding = true;
navigator.clipboard.writeText = text => {
if (isOverriding) {
isOverriding = false;
navigator.clipboard.writeText = originalWriteText;
return originalWriteText(copyText);
}
return originalWriteText(text);
};
setTimeout(() => {
if (isOverriding) {
isOverriding = false;
navigator.clipboard.writeText = originalWriteText;
}
}, 100);
};
const wrapper = wrapperRef.current;
wrapper.addEventListener('click', handleClick, true);
return () => {
wrapper.removeEventListener('click', handleClick, true);
if (navigator.clipboard.writeText !== originalWriteText) {
navigator.clipboard.writeText = originalWriteText;
}
};
}, [copyText]);
return
{displayText}
;
};
Unified Phone Experience では、テナント内のすべての電話プロバイダー設定を 1 か所に集約できるため、さまざまな電話認証要素ごとに同じ電話プロバイダーを何度も設定する必要がありません。詳細については、[MFA 向けに Auth0 の Unified Phone Experience を使用する](/ja/docs/customize/phone-messages/unified-phone/use-auth0s-unified-phone-experience-for-multi-factor-authentication)を参照してください。
認証要素として SMS または音声を使用する場合、エンドユーザーがアプリケーションへの認証を試みると、SMS または音声で code が送信され、トランザクションを完了するにはその code を入力する必要があります。つまり、ユーザーはログイン資格情報を把握しているだけでなく、MFA 用に登録したデバイスを所持している必要があります。
SMS と音声の認証要素は、Dashboard または Management API を使用して設定でき、SMS や音声でメッセージを送信したり、エンドユーザーが code の受信方法を選択できるようにしたりできます。配信プロバイダーを Actions で設定することも、Twilio アカウントを設定することもできます。エンドユーザーに SMS のみを送信する場合は、Auth0 のデフォルトのメッセージ配信サービスを設定することもできます。MFA の音声通知を有効にするには、Universal Login を使用する必要があります。
この機能を利用できるかどうかは、使用しているログイン実装と Auth0 プラン、またはカスタム契約の内容によって異なります。詳細については、[Pricing](https://auth0.com/pricing)を参照してください。
## 動作の仕組み
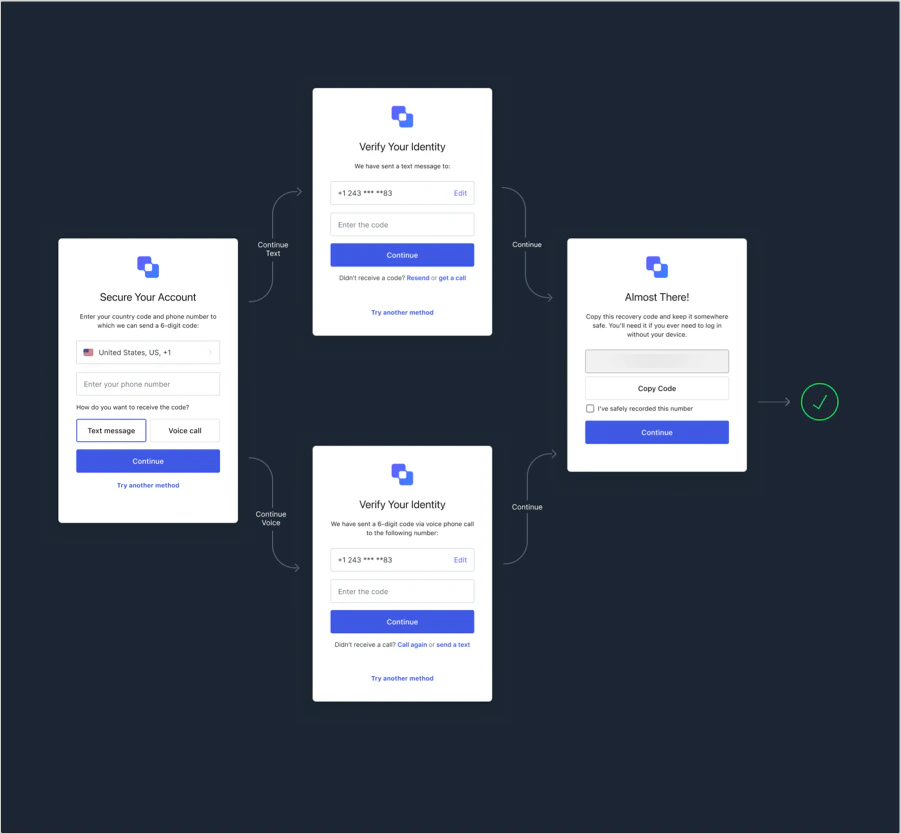
SMS と音声を有効にすると、ユーザーは SMS または音声で code を受け取る方法を選んで登録できます。
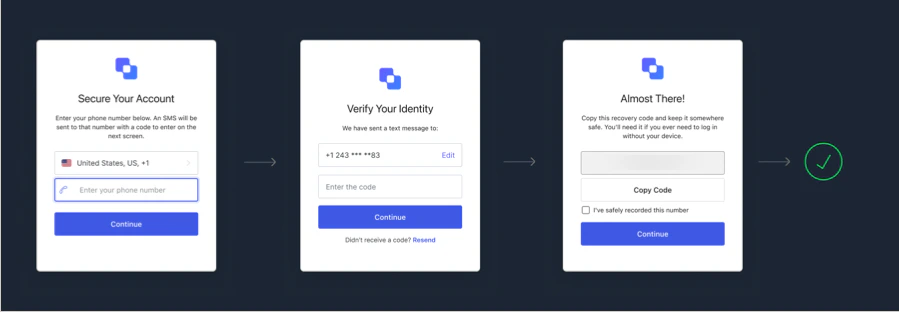
 SMS のみを有効にした場合、フローはよりシンプルになります。
 ユーザーの登録が完了すると、次回認証時に登録済みの電話番号へ音声通話または SMS メッセージが送信されます。
## Dashboard を使用する
1. [Dashboard > Security > Multi-factor Auth](https://manage.auth0.com/#/multifactor-auth) に移動します。
2. **Phone Message** をクリックし、画面上部のトグルスイッチを有効にします。
3. 使用するメッセージ配信プロバイダーを選択します。
4. ユーザーが SMS と音声で認証できるようにするには、SMS と音声の認証要素を有効にし、使用する配信方法を選択する必要があります。
1. **Auth0**: このプロバイダーでは音声メッセージを送信できません。Auth0 で内部設定された SMS 配信プロバイダーを使用して SMS メッセージを送信します。評価およびテスト目的でのみ使用でき、テナントの全期間を通じて、送信できるメッセージはテナントごとに最大 100 件までです。100 件の上限に達すると、新しい code は受信されなくなります。
2. **Twilio**: SMS には [Twilio Programmable SMS API](https://www.twilio.com/sms)、音声には [Twilio Programmable Voice API](https://www.twilio.com/voice) を使用してメッセージを送信します。Test Credentials ではなく、Twilio Life Credentials を使用してください。Test Credentials は、本番環境でメッセージを送信するためだけに使用するものです。
3. **Custom**: [Send Phone Message Flow](/ja/docs/customize/actions/explore-triggers/mfa-notifications-trigger) の Action を呼び出してメッセージを送信します。
また、ユーザーが SMS テキストメッセージ、音声通話、またはその両方を受け取れるように設定することもできます。
### Twilio の設定
注意: Twilio では、番号の一括移管と確認に最大 8 週間かかる場合があります。詳しくは、[Twilio Help Center](https://help.twilio.com/articles/223179468-How-long-does-it-take-to-port-a-number-to-Twilio) を参照してください。
Twilio 経由で SMS を配信する場合は、次の手順に従って SMS 認証要素を設定します。
1. Twilio でアカウントを作成します。[Twilio Account SID](https://www.twilio.com/help/faq/twilio-basics/what-is-an-application-sid) と [Twilio Auth Token](https://www.twilio.com/help/faq/twilio-basics/what-is-the-auth-token-and-how-can-i-change-it) が必要です。これらは、Auth0 がユーザーに SMS を送信する際に使用する Twilio API の認証情報です。
2. 地理的リージョンに応じて、[SMS](https://support.twilio.com/hc/en-us/articles/223181108-How-International-SMS-Permissions-work) または [音声](https://www.twilio.com/console/voice/calls/geo-permissions) の Permissions を有効にする必要がある場合もあります。音声 を使用する場合、アカウントには音声通話を発信できるよう有効化された Twilio の電話番号が必要です。これは [Twilio で確認済みの](https://support.twilio.com/hc/en-us/articles/223180048-Adding-a-Verified-Phone-Number-or-Caller-ID-with-Twilio) 外部の電話番号でもかまいません。または、アカウント内から Twilio の電話番号を購入して設定することもできます。
3. 接続を設定します。[Dashboard > Security - Multi-factor Auth](https://manage.auth0.com/#/security/mfa) に移動し、**Phone Message** を選択します。
4. **Choose your delivery provider** で **Twilio** を選択し、配信方法を選択します。
5. **Twilio Account SID** と **Twilio Auth Token** を対応するフィールドに入力します。
6. **SMS Source** を選択します。
1. **Use From** を選択した場合、ユーザーに SMS の送信元として表示される **From** の電話番号を入力する必要があります。これは Twilio 側で設定することもできます。
2. **Use Messaging Services** を選択した場合は、[Messaging Service SID](https://www.twilio.com/docs/sms/services/services-send-messages) を入力する必要があります。
3. 音声 を使用している場合は、SMS に **Message Services** を使用していても、必ず **From** を設定する必要があります。その電話番号が SMS と音声メッセージの両方を送信できるよう設定されていることを確認してください。
7. **Save** をクリックします。
### SMS または音声メッセージのテンプレートをカスタマイズする
SMS や音声メッセージのテンプレートはカスタマイズできます。詳しくは、[SMS と音声メッセージのカスタマイズ](/ja/docs/customize/customize-sms-or-voice-messages)を参照してください。
## Management API を使用する
Management API を使用すると、`/api/v2/guardian/factors/phone/message-types` エンドポイントで、有効にするメッセージの配信方法を設定できます。`message_types` パラメーターは配列で、`["sms"]`、`["voice"]`、または `["sms", "voice"]` を指定できます。API を呼び出すには、ベアラートークンとして `update:guardian_factors` スコープを持つ [Management API アクセストークン](/ja/docs/secure/tokens/access-tokens/management-api-access-tokens) が必要です:
```bash cURL theme={null}
curl --request PUT \
--url 'https://{yourDomain}/api/v2/guardian/factors/phone/message-types' \
--header 'authorization: Bearer MGMT_API_ACCESS_TOKEN' \
--header 'content-type: application/json' \
--data '{ "message_types": ["sms", "voice"] }'
```
```csharp C# theme={null}
var client = new RestClient("https://{yourDomain}/api/v2/guardian/factors/phone/message-types");
var request = new RestRequest(Method.PUT);
request.AddHeader("content-type", "application/json");
request.AddHeader("authorization", "Bearer MGMT_API_ACCESS_TOKEN");
request.AddParameter("application/json", "{ "message_types": ["sms", "voice"] }", ParameterType.RequestBody);
IRestResponse response = client.Execute(request);
```
```go Go theme={null}
package main
import (
"fmt"
"strings"
"net/http"
"io/ioutil"
)
func main() {
url := "https://{yourDomain}/api/v2/guardian/factors/phone/message-types"
payload := strings.NewReader("{ "message_types": ["sms", "voice"] }")
req, _ := http.NewRequest("PUT", url, payload)
req.Header.Add("content-type", "application/json")
req.Header.Add("authorization", "Bearer MGMT_API_ACCESS_TOKEN")
res, _ := http.DefaultClient.Do(req)
defer res.Body.Close()
body, _ := ioutil.ReadAll(res.Body)
fmt.Println(res)
fmt.Println(string(body))
}
```
```java Java theme={null}
HttpResponse response = Unirest.put("https://{yourDomain}/api/v2/guardian/factors/phone/message-types")
.header("content-type", "application/json")
.header("authorization", "Bearer MGMT_API_ACCESS_TOKEN")
.body("{ "message_types": ["sms", "voice"] }")
.asString();
```
```javascript Node.JS theme={null}
var axios = require("axios").default;
var options = {
method: 'PUT',
url: 'https://{yourDomain}/api/v2/guardian/factors/phone/message-types',
headers: {
'content-type': 'application/json',
authorization: 'Bearer MGMT_API_ACCESS_TOKEN'
},
data: {message_types: ['sms', 'voice']}
};
axios.request(options).then(function (response) {
console.log(response.data);
}).catch(function (error) {
console.error(error);
});
```
```php PHP theme={null}
$curl = curl_init();
curl_setopt_array($curl, [
CURLOPT_URL => "https://{yourDomain}/api/v2/guardian/factors/phone/message-types",
CURLOPT_RETURNTRANSFER => true,
CURLOPT_ENCODING => "",
CURLOPT_MAXREDIRS => 10,
CURLOPT_TIMEOUT => 30,
CURLOPT_HTTP_VERSION => CURL_HTTP_VERSION_1_1,
CURLOPT_CUSTOMREQUEST => "PUT",
CURLOPT_POSTFIELDS => "{ "message_types": ["sms", "voice"] }",
CURLOPT_HTTPHEADER => [
"authorization: Bearer MGMT_API_ACCESS_TOKEN",
"content-type: application/json"
],
]);
$response = curl_exec($curl);
$err = curl_error($curl);
curl_close($curl);
if ($err) {
echo "cURL Error #:" . $err;
} else {
echo $response;
}
```
```python Python theme={null}
import http.client
conn = http.client.HTTPSConnection("")
payload = "{ "message_types": ["sms", "voice"] }"
headers = {
'content-type': "application/json",
'authorization': "Bearer MGMT_API_ACCESS_TOKEN"
}
conn.request("PUT", "/{yourDomain}/api/v2/guardian/factors/phone/message-types", payload, headers)
res = conn.getresponse()
data = res.read()
print(data.decode("utf-8"))
```
```ruby Ruby theme={null}
require 'uri'
require 'net/http'
require 'openssl'
url = URI("https://{yourDomain}/api/v2/guardian/factors/phone/message-types")
http = Net::HTTP.new(url.host, url.port)
http.use_ssl = true
http.verify_mode = OpenSSL::SSL::VERIFY_NONE
request = Net::HTTP::Put.new(url)
request["content-type"] = 'application/json'
request["authorization"] = 'Bearer MGMT_API_ACCESS_TOKEN'
request.body = "{ "message_types": ["sms", "voice"] }"
response = http.request(request)
puts response.read_body
```
## 統合済みの SMS メッセージングプロバイダー
Auth0 では、デフォルトで Twilio を介したメッセージ送信がサポートされています。ただし、別の SMS プロバイダーを使用したり、メッセージ送信前に特定のロジックを追加したり、ユーザーやアプリケーションに応じて異なるメッセージを送信したりすることもできます。これを行うには、[Send Phone Message Flow](/ja/docs/customize/actions/explore-triggers/mfa-notifications-trigger) で、統合済みの [Actions](/ja/docs/customize/actions) のいずれかを使用するように SMS MFA を設定します。
統合済みの SMS メッセージングプロバイダーには、次のものがあります。
* [Amazon SNS](https://marketplace.auth0.com/integrations/amazon-sms-provider)
* [ClickSend](https://marketplace.auth0.com/integrations/clicksend-sms)
* [Esendex](https://marketplace.auth0.com/integrations/esendex-sms-provider)
* [Infobip](https://marketplace.auth0.com/integrations/infobip-sms-provider)
* [Mitto](https://marketplace.auth0.com/integrations/mitto-sms-provider)
* [Telesign](https://marketplace.auth0.com/integrations/telesign-sms-verification)
## カスタム電話プロバイダー
Actions を使用して、カスタム電話プロバイダーを設定することもできます。詳細については、[カスタム電話プロバイダーを設定する](/ja/docs/customize/phone-messages/configure-phone-messaging-providers/configure-a-custom-phone-provider)を参照してください。
## セキュリティに関する考慮事項
電話メッセージングプロバイダーを使用する場合は、サインアップフローを悪用する攻撃者によって金銭的被害が発生するおそれがあることに注意してください。
Auth0 では、1 人のユーザーが送信できる SMS または音声メッセージは 1 時間あたり最大 10 件までに制限されています。また、メールアドレスまたは認証器による OTP フローは、5 分あたり 5 件までに制限されています。 (バーストレートは 10 ですが、新規リクエストとして送信される音声メッセージは 1 時間あたり 1 件のみです。) アカウントをさらに保護するため、次の対策を検討してください。
* [Suspicious IP Throttling](/ja/docs/secure/attack-protection/suspicious-ip-throttling#signup-attempts) を有効にします。Auth0 は、1 分間に 50 件を超えるサインアップリクエストを試みた IP をブロックします。
* [Log Streaming](/ja/docs/customize/log-streams) を有効にし、`gd_send_voice`、`gd_send_voice_failure`、`gd_send_sms`、`gd_send_sms_failure` のいずれかの[ログイベント](/ja/docs/deploy-monitor/logs/log-event-type-codes)数が急増した場合に、お使いの監視ツールでアラートを作成します。
電話メッセージングプロバイダー側にも追加の保護機能があります。Twilio を使用している場合は、[Twilio's Anti-Fraud Developer Guide](https://www.twilio.com/docs/usage/anti-fraud-developer-guide) を参照してください。次のオプションも検討してください。
* [SMS](https://support.twilio.com/hc/en-us/articles/223181108-How-International-SMS-Permissions-work) と [Voice](https://support.twilio.com/hc/en-us/articles/223180228-International-Voice-Dialing-Geographic-Permissions-Geo-Permissions-and-How-They-Work) について、メッセージの送信先となる国を制限します。これは、通常ビジネスを行っていない国の中に、[toll fraud](https://www.twilio.com/learn/voice-and-video/toll-fraud) のリスクが高い国や通話料金が高額な国がある場合に特に有効です。
* 不正利用やコーディングミスからアカウントを保護するため、Twilio の [usage triggers](https://support.twilio.com/hc/en-us/articles/223132387-Protect-your-Twilio-project-from-Fraud-with-Usage-Triggers) を有効にします。
## 詳細
* [SMS および音声認証器の登録とチャレンジ](/ja/docs/secure/multi-factor-authentication/authenticate-using-ropg-flow-with-mfa/enroll-challenge-sms-voice-authenticators)
* [Attack Protection](/ja/docs/secure/attack-protection)
* [Log Streams](/ja/docs/customize/log-streams)